


No products in the cart.

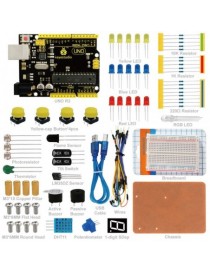
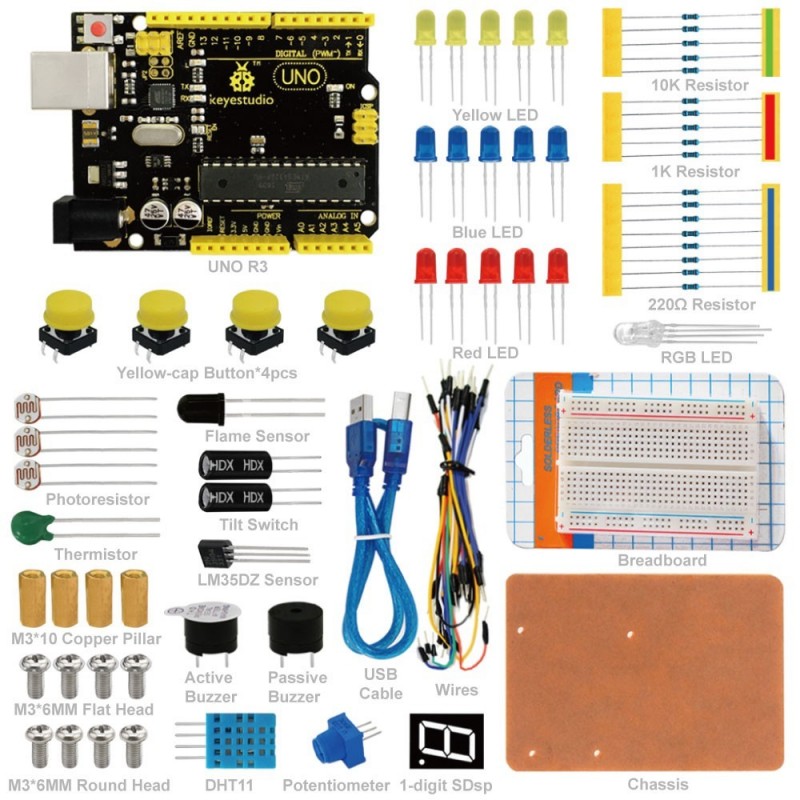
keyestudio UNO R3 Breadboard kit for Arduino
WIKI: http://wiki.keyestudio.com/index.php/Ks0070_keyestudio_UNO_R3_Breadboard_Kit_for_Arduino
Video: http://www.keyestudio.com/wp/2016/05/ks0070-uno-r3-breadboard-kit-for-arduino/
UNO R3 Breadboard kit is a learning kit based on UNO R3 development board. It's equipped with basic elements for ARDUINO experiments, including breadboard, Dupont wires, LEDs, resistors. With this kit, you can perform simple LED experiments, such as LED blinking, LED chasing effect, etc. It is both affordable and portable for your Arduino learning.
Uno R3 compatible board
Dupont connector wires
1x 9v battery cable
1x USB cable
400-pin Breadboard
5x LED - Blue
5x LED - Red
5x LED - Yellow
5x 10K ? resistor
5x 1K ? resistor
8x 220 ? resistor
Microcontroller: ATmega328
Operating Voltage: 5V
Input Voltage (recommended) : 7-12V
Input Voltage (limits): 6-20V
Digital I/O Pins: 14 (of which 6 provide PWM output)
Analog Input Pins: 6
DC Current per I/O Pin: 20 mA
DC Current for 3.3V Pin: 50 mA
Flash Memory: 32 KB (ATmega328) of which 0.5 KB used by bootloader
SRAM: 2 KB (ATmega328)
EEPROM: 1 KB (ATmega328)
Clock Speed: 16 MHz
Length: 8.6 mm
Width: 53.4 mm
Weight: 25 g
See http://arduino.cc for detailed specifications, overviews, schematics, etc. Core functions, code examples, and links to many of the device libraries can be found in the learning section; refer to the manufacturer's site if using other add-on shields or sensors.
The latest Arduino Integrated Development Environment (IDE) necessary for programming your UNO R3 board can be obtained at http://arduino.cc/en/Main/Software (the Download menu choice on Arduino.cc)
Examples for many basic components can be found under the Examples menu. As you install libraries for additional shields, new examples may be available.
Follow the getting started guide found on the arduino.cc web site. Click Learning, and select Getting started. Click on the link for Windows, Mac OS X, or Linux for more specific directions.
1. Download the Arduino Environment (IDE) and install or unzip/extract the application directory.
2. Connect the UNO board to one of your computer's USB port.
3. Install the drivers (If the computer does not automatically download and install the necessary USB drivers, point the hardware setup to the "drivers" directory of the Arduino IDE application.)
4. Launch the Arduino IDE application
5. Open a sketch example such as "Blink"
6. Select your Board from the Tools menu.
7. Select the Serial Port used by the board
8. Upload the sketch to the board
| UNO R3 Breadboard kit for Arduino PDF(2.15 MB ) | Download |

keyestudio UNO R3 Breadboard kit for Arduino
keyestudio UNO R3 Breadboard kit for Arduino
keyestudio UNO R3 Breadboard kit for Arduino